
Winter has returned to the mountain top after Mother Nature decided she was mad at me.
It is what it is. I can't change it so I just have to continue on with my spring dreams.
It was a blustery cold damp miserable day yesterday with snow, sleet, freezing rain....you get the picture.

Rotten to the core. The perfect day to be indoors by a nice toasty warm fire.
Or perhaps in another warm spot in the house, hmmmmm?

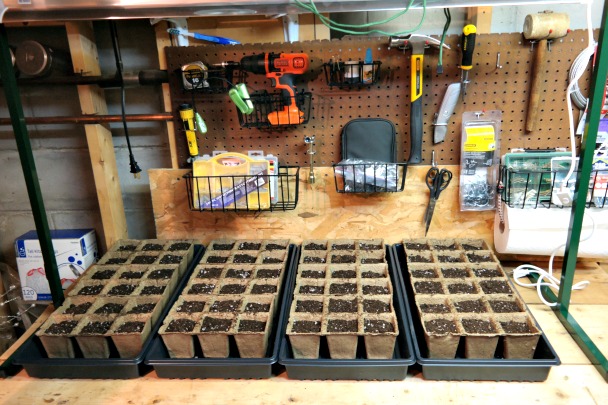
Welcome to my utility room! It's not the most glamorous room in my house but it serves its purpose.
I had decided that it was going to serve yet another purpose.....as a pseudo greenhouse.
Since I don't have one.....yet.
The utility room is always warm since the boiler is in there. And my workbench was just the right size to hold a 4 foot grow light. The warmth would be much more consistent in this little room than in my garden cottage so I decided this was a better place for seed starting. Not quite as cute, but it will get the job done.
Perfect, let's go!
My supplies had all arrived and it was time to assemble my seed starting station.

First things first....clear off the workbench.

I started by assembling the light stand. I bought this one on Amazon .

It comes as a bunch of metal parts which were super easy to put together.

I used a rubber mallet to help tap the pieces together and the whole thing was assembled in under 5 minutes.
Easy peasy - my favorite.

No problems with assembly at all until I discovered the light bulb was broken.
Uh oh.....oh well, I'll assemble it anyway and contact Amazon for a replacement bulb.
Continuing on.

This grow light system is awesome - the light bar is raised and lowered just like a window shade - how much simpler could it get? Perfect!

Next came the growing trays. I ordered a set of 5 from....Amazon, where else?
I could only fit 4 at a time under the grow light. Oh well.

I decided to stay away from the plastic seed starting pots. I wanted something that was eco friendly and easy peasy. Enter the Cow Pot - I ordered these from Gardener's Edge - they had the best pricing by far.
I'm using larger pots rather than teeny tiny seed starting pots - this way the seedlings can stay in them right through the time to plant them in the garden. There's much less chance of damaging the seedlings that way....the less they are handled, the better.
These pots get planted right in the garden - they are made of dehydrated cow manure so the pots will break down and enrich the soil. The roots will grow right through the pot when it's in the soil and softens up. So simple and helps the earth in more ways than one!
That's a win - win for me!

Each tray holds 3 of the 6 pack cow-pots. That gives me a total of 72 plants I can start at one time.

I used an organic seed starting mix that I also ordered through Amazon. I'm sure you can find it other places but we are extremely limited with shop options up here on the mountain top so I often turn to online shopping for simplicity's sake.

I put the cow pots into a cardboard box and used a plastic cup to fill up each square. I shook them gently and tapped the sides to settle the soil and then put them into their trays.
Trying to keep the mess to a minimum of course.
When all was said and done this project probably took me about an hour from start to finish.

Next step is to go through my seed order which has also arrived from Johnny's Selected Seeds. I will sort out the seeds into different piles: those that are direct sow (straight into the garden, no need to start indoors); those that need to be sown now indoors; and those that can wait for the second round, when these seedlings are up and running.
That's a project for another time. I was done with being down in the utility room for now - man, it's warm in there!
I went upstairs to see where my little garden helpers were. They were awfully quiet....

I found my old girl, Lily, asleep in her little bed by the heater, next to her basket of toys.

And the Monkey was contentedly napping in her favorite chair right in front of the fire.
Squishing my pillows as usual.
Mommy's angels....my little butterflies....I do love them so!
Spoiled beyond belief. Just the way it should be.
I don't have any room to start seeds indoors. But Israel got my Gardener's Supply Periwinkle 3x6 foot raised garden put together the other day. Then he just had to take a pic and post Charlie on FB sitting in it looking goofy. It was near freezing last night; probably the same tonight. I don't feel safe until April 15.
ReplyDeleteBrenda
You're lucky you can keep perennials going in your containers - that saves you a ton each year on buying plants! They wouldn't last here...it's a shame.
DeleteGreat idea. You will definitley have a jumpstart on things.
ReplyDeleteThat's the plan, Marty!
DeleteNice! I hope to get my seeds started soon...
ReplyDeleteIt takes a bit of time but it sure is worth it!
DeleteThat will be fun watching them grow. Love your neat and tidy utility room.
ReplyDeleteI'm so excited to see those first little sprouts pop up!
DeleteOh, look at you, Ms Gardner! These sounds like a great thing to do until you get your 'she shed'. Glad you have a temporary warm place for your little seeds to grow. Stay safe during the cold spell!
ReplyDeletebe a sweetie,
Shelia ;)
I do love to garden, that's for sure - the bug bit me years ago when I bought my very fist house!
DeleteWhat a great idea! It will satisfy your spring fever and then you'll have pretty starts blooming soon. Warm enough here that I spent the day in the garden. Almost done with clean up and I planted some lettuce and onions. Hope you get warm weather soon. Looks like the critters don't mind it. :)
ReplyDeletehugs,
Jann
Oooh lucky you, Jann!! Cold but sunny here today - hopefully most of the snow will miss us and then the weather will be turning spring-like again in the middle of the week!
DeleteMy husband started his seeds indoors a week or two ago. They are under a lamp that is on a timer in the small office next to our kitchen. He started all of his tomato plants this way last year, from seeds.... this year he has also started our pepper plants this way. Love that light system you have1
ReplyDeleteYour hubby loves to garden, doesn't he? I can tell!
DeleteOh my goodness, now you and I are kindred spirits for sure, even if 2000+ miles separate us, lol! I started my seeds indoors yesterday too! I was interested in seeing your system, and how you do it, and it is quite like mine. I wasn't as good as you, taking pictures to showcase my journey, and not so neat either, dirt was flying, lol! I'll be sharing my experience probably later today. I enjoyed seeing yours! :)
ReplyDeleteHa ha perhaps I'm a little bit of a neatnik? If I was out in my garden cottage I wouldn't worry quite so much as I would just take a broom and sweep the debris right out the door and down the ramp. Can't wait to see your system!!
DeleteWill be anxious to see your baby seedlings.
ReplyDeleteGreat set-up. And your girls look oh-so-comfortable
taking their winter nap.
They always make themselves comfortable, that's for sure!!
DeleteWhat a productive time you had in your 'make do' greenhouse. Where there's a will, there's a way as the saying goes.
ReplyDeleteHappy Spring ~ FlowerLady
I'd really love a 'proper' greenhouse someday but I'm not sure it's in the cards....sigh.
Delete